A Beginner’s Guide to Testing Your Code
Ever wondered what testing your code means and how to go about it? This friendly guide explains everything you need to know to get started including different methods for testing, different types of tests, and how to set up a professional code testing environment.

Few things are more reliable in the world of web development than the fact that if you’re writing code, you’re going to have errors and bugs. These pesky issues affect the stability and functionality of your website and can cost quite a bit of time, money, and let’s be honest — sanity! So, what’s a web developer to do?
This is where testing your code comes in!
Testing your code is essential to the web development process, making it a crucial skill for web developers of all levels to hone. Taking the time to test your code means you’ll have more opportunities to catch and fix errors, which means you’ll have a more reliable, stable, and maintainable website. This results in happier developers, users, and employers!
Testing comes in many forms: usability testing, quality assurance (QA) testing, acceptance testing, functional testing, compatibility testing, security testing… the list goes on and on (and we’ll discuss these more later). In this blog post, we’ll focus on the foundational concepts behind testing, the concepts upon which more sophisticated types of testing are built.
Sound good? Let’s dive into how you can test your code as a beginner developer!
Table of Contents
- What Exactly Does Testing Your Code Mean?
- Why Do You Need to Test Your Code?
- Ways You Can Test Your Code
- Types of Testing
- Testing in a Professional Environment: Everything You Need to Know
- How to Decide Which Type of Testing Is Right for Your Project
- Resources for Testing Your Code
- How to Get Started Testing Your Code

Is Tech Right For you? Take Our 3-Minute Quiz!
You Will Learn:
☑️ If a career in tech is right for you
☑️ What tech careers fit your strengths
☑️ What skills you need to reach your goals

What Exactly Does Testing Your Code Mean?
Testing code is simply a series of exercises you perform to check whether your code works as planned. The testing process can be compared to creating a new recipe at a bakery. Imagine that you’ve been working on a recipe for a whole wheat olive loaf. Before you start selling your new product to customers, you bake a loaf of bread and taste test it to make sure it has just the right rise, just the right amount of olives, and is seasoned well. You make fixes to the recipe and bake more test loaves until the bread tastes just like what you imagined. In other words, you test the recipe for any mistakes you made and fix them. After all, you wouldn’t want to sell a dense, bland loaf of bread to customers, would you??
In technical terms, testing refers to a series of systematic processes that check whether your code matches the expected outcome. When testing, developers use manual and automated methods to check different pieces of functionality. This allows them to detect errors before code is deployed to a live website, where customers could have a subpar experience as a result of buggy code.
Regardless of your age or level of expertise, testing your code is a continuous process that developers must practice regularly.
Why Do You Need to Test Your Code?
Any developer with testing experience will tell you that it can sometimes be frustrating to track down a bug. Despite this inherent frustration, testing is considered a required practice for developers. Here are four important reasons why testing your code matters:
- By testing your code, you’ll know if it matches your expectations. Your code is only as useful as the results it produces. And with multiple tests, you can identify, manage, and fix low-hanging issues before you deploy the product.
- Testing provides additional clarity on the product’s requirements. Something that can surprise many junior developers is that it can be challenging to understand product requirements and how to create a product that meets them. Testing provides an opportunity for you to gain a better understanding of the client’s needs because the process of designing the test forces you to gain a better understanding of the how and why of a product feature so that you can write a thorough test.
- Privacy and security matter a great deal in today’s digital space. By testing your code, you’ll be able to determine if it provides adequate coverage for users’ data. Being a great developer means making sure users do not suffer from data breaches and leaks when they use your product.
- Device compatibility and product reliability depend heavily on the testing process. As a developer, you’ll want to build a product that functions properly across a variety of devices. You’ll also want a stable product users can always rely on. Testing helps you detect gaps that may affect user satisfaction and trust.
While testing is crucial, be careful not to fall down the rabbit hole 🕳️ of writing more tests than actual project code—it’s important that you find a balance that works for you ⚖️.
Is Tech Right For you? Take Our 3-Minute Quiz!
You Will Learn:
☑️ If a career in tech is right for you
☑️ What tech careers fit your strengths
☑️ What skills you need to reach your goals
Ways You Can Test Your Code
To drive things home, I’ll walk you through two methods you can use to test your code as a budding developer.
1. Manual Testing
With this method, developers create human-readable test cases to be performed manually—meaning literally by a human—without the support of automated tools. Each test case contains a series of steps that, when completed successfully, verify that the functionality is working as expected. Let’s look at a basic example:
Test Case: Verify that users can log into the website.
Steps:
- Visit https://mysupercoolwebsite.com/log-in/.
- Enter test username and password.
- Click “Log In”.
- Observe the welcome screen after logging in.
In this test case, if the tester successfully completes all four steps, it means the test passed. If they do not, for example, observe the welcome screen as described in step 4, the test fails.
This example focuses on one small part of a website. To test an entire website, developers create a large group of test cases, called a test suite, and run through all of the tests. Once completed, any bugs—the results of failed tests—are fixed and the tests are manually run again.
2. Automated Testing
Manual testing is useful for smaller websites or pieces of functionality, but if you were to test a large website or web application using manual tests only, it would take you hours upon hours and be incredibly tedious. In these instances, developers use automated testing, which is exactly what it sounds like: an automated—or computerized—version of manual testing.
In automated testing, developers write test cases using special syntax in computer files, much like how they write website code itself. The tests are then run by a computer and the results are displayed directly on the screen or output to a file. Let’s look at an automated version of our manual test above, run using a tool called Codeception:
$I = new AcceptanceTester($scenario);

$I->wantTo('Sign in as a valid user');

$I->amOnPage('https://mysupercoolwebsite.com/log-in/');

$I->fillField('#user_login','testusername');

$I->fillField('#user_pass', 'supersecrettestpassword');

$I->click('login-submit');

$I->seeCurrentUrlEquals('https://mysupercoolwebsite.com/welcome/');
The goal of this test is exactly the same as its manual testing counterpart above, except it’s written so that it can be automated and run by a computer. This takes a fraction of the time it would take a human to complete the manual test, and it removes the risk of human error causing false negatives — a fancy way of saying that the human made a mistake while running the test instead of the code having a bug.
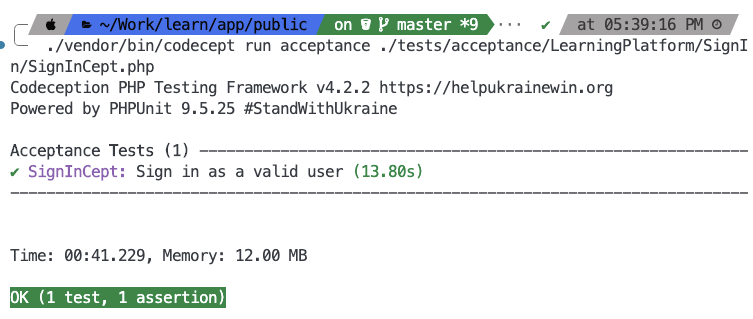
When the test above is run and passes, the result looks like this:
There are many automation tools you can use to test and evaluate your code. We’ll get to those in a bit!
Bonus Method: Using AI Support Tools
Consider AI tools as testing automation on superdrive plus a tutor in your pocket. With AI programming tools, you can test repetitive tasks, scan millions of lines of code, and catch programming errors quickly.
By using AI tools to handle repetitive tasks, you can focus more on testing other features that require more attention. Using AI as a beginner developer is smart for two reasons:
- You’re able to save time, shorten testing timelines, and deliver your product faster.
- Many of these tools are beginner friendly and help you write better code. They often explain errors and teach you how to troubleshoot and debug your code.
AI tools can prove pretty useful in the web development workflow. One way developers use AI to write more reliable and maintainable code is by using a tool like CodiumAI. CodiumAI is a code editor plugin that analyzes your code as you write it and suggests tests. All you have to do is review the test suggestions and accept them, and then you’re on your way to having a suite of automated tests for your website!
Is Tech Right For you? Take Our 3-Minute Quiz!
You Will Learn:
☑️ If a career in tech is right for you
☑️ What tech careers fit your strengths
☑️ What skills you need to reach your goals
Types of Testing
Now that you understand the various methods for testing your code (manual or automated), let’s review the specific types of testing. As specified by GeeksforGeeks, here are some popular types of testing you can try:
1. Unit Testing
Unit testing focuses on testing individual components—or units—of a web application. In software development, a “unit” refers to the smallest testable part of an application, such as a function, method, or class. The purpose of unit testing is to ensure that each unit of code performs its intended functionality correctly and independently of other parts of the application.
Example of a “unit” of code, in Javascript:
// This JavaScript method accepts two numbers, adds them together, and returns the result
add: function(number1, number2) {
    return number1 + number2;
}
Developers rely on unit testing because they help to catch bugs earlier in the development process. These bugs can then be fixed before they grow into more complex parts of the application. In the long run, this makes testing and debugging simpler and faster!
2. Integration Testing
Integration testing focuses on how multiple units within a codebase interact with each other and work together. The primary goal of integration testing is to ensure that these parts function as expected when integrated together—hence the name!
For example, imagine that you’re a developer building an online shopping cart. Your cart will have several pieces of functionality: adding an item, deleting an item, tallying the cost, etc. Adding an item includes displaying the item in the user’s cart as well as reducing the total numbers of items available to purchase by one, meaning, this one action by the user includes two different units.
So, as the developer, you would write an integration test to verify that when a user clicks “Add to Cart” next to an item, the item is added to the user’s cart AND that the total number of items available is updated.
3. End-to-End Testing
In end-to-end testing, a web application is thoroughly tested from beginning to end to ensure that all parts are functioning as expected, including the codebase itself, the database connection, integrations with external services like APIs, and user interfaces. You can almost think of this as the opposite of unit testing: instead of focusing on one small piece of a codebase, it focuses on how all of those pieces work together from a user’s perspective.
End-to-end tests are commonly used by developers to verify that an entire web application works as requested before it’s delivered to the client or stakeholder.
Remember our manual sign-in test above? We could start expanding on that to end-to-end test a to-do app:
- Test the login feature:
- Visit https://mysupercoolwebsite.com/log-in/.
- Enter test username and password.
- Click “Log In”.
- Observe the welcome screen after logging in.
- Testing adding a new to-do:
- Click “Add New” to create a new to-do item.
- Enter the title, description, and due date for the to-do.
- Click “Save”.
- Observe the newly created to-do on the screen.
- Test deleting a to-do:
- Click “Delete” on a to-do item.
- Observe the “Do you really want to delete this to-do item?” dialog box.
- Click “Yes”.
- Observer that the to-do item no longer exists.
And so on!
4. Compatibility Testing
Compatibility testing evaluates how well a web application functions across different environments, platforms, devices, browsers, and configurations. The goal of compatibility testing is to ensure that the software functions as expected and provides a consistent user experience across a wide range of settings. It helps identify and address issues related to compatibility, such as rendering problems, functionality discrepancies, or performance issues.
For example, we could perform a compatibility test on our https://mysupercoolwebsite.com/ example site by checking how the site performs on the following things:
- Chrome browser on Mac computer
- Chrome browser on a PC computer
- Safari browser on an iPhone 14
- Samsung Internet Browser on a Galaxy S23
- A different hosting provider, like WP Engine vs. Kinsta
In our compatibility test, we’d want to make sure that our site looks, feels, and functions the same across all of these locations. This includes the layout, colors, fonts, spacing, and page load times, among other things.
5. Smoke Testing
Smoke testing is used to determine whether the core functionalities of an application are working as expected after a big round of development. Think of smoke testing as a preliminary sanity check to determine whether it’s worthwhile to proceed with more complex and time-consuming testing like unit testing or integration testing.
Fun fact! The term “smoke test” originates from hardware testing, where it referred to the initial test performed on a piece of hardware to check if it emitted smoke—indicating a severe problem—when powered on.
An example of a smoke test would be to simply click around a website to make sure that all the site’s pages load and nothing is visibly broken.
Is Tech Right For you? Take Our 3-Minute Quiz!
You Will Learn:
☑️ If a career in tech is right for you
☑️ What tech careers fit your strengths
☑️ What skills you need to reach your goals
Testing in a Professional Environment: Everything You Need to Know
As a beginner developer, you’ll spend a lot of time on test environments. A test environment refers to the virtual space developers use to run test cases. It involves a software environment, hardware elements, data, and of course, humans. Test environments are completely isolated from the live website or web application environment accessed by users so that the live site remains untouched during testing, meaning they are a place where you can hack away at your code and not worry that you’re going to cause your company to lose millions of dollars by accidentally breaking something.
Let’s explore the elements of a test environment.
Elements of a Test Environment
A functioning test environment allows testers to work easily with predetermined variables when they perform their tests. It also provides consistent, reliable performance from the application that’s being tested.
As a beginner developer, you would most likely join a team that already has a test environment in place. The goal of a test environment is to recreate the live, production environment outside of the live production environment. Unfortunately, depending on the size of a website or a web applications database (think Facebook) that can be hard to do.
The key elements of a test environment are somewhat standardized and include:
- A database: Your database hosts all the data you need to test your software. This could be actual data from the live site, but in most cases the data is simplified test data that represents real data.
- Manual testers: These human testers check the quality of the product without automated testing tools or scripting.
- Automation testers: Automation testers are developers who write automated tests like unit tests and integration tests. They are responsible for testing, debugging, and simulating the software experience.
- Network protocols: They refer to the network configurations the software needs to work. Using a network throttle lets you determine how well your website functions at different server speeds.
In other words, the key thing to know when it comes to building your test environment is that it often takes more than just running the code on your computer to create a test environment, you need to take all the variables into consideration and make sure you’re accounting for them!
How to Decide Which Type of Testing Is Right for Your Project
The right type of testing for your project will depend on factors unique to you, the project’s use case, and intended audience. Kayla Ford, a Senior QA and Dev Team Lead at Skillcrush, also shared her thoughts on the above.
In her words, “It depends on the application, its intended audience, and intended use. Always start with a smoke test. Does it work as expected? For example, if you’re building a webpage with heavy user interaction, you’d want to do functional testing, cross-browser testing, and accessibility testing.”
Resources for Testing Your Code
New web apps and trends have radically changed how developers test and debug code. Here, we’ll outline four popular coding resources for budding developers.
1. JSBin
This simple JavaScript debugging console is a favorite amongst developers. JSBin has a collaborative space where you can share private links with other developers and code together in real-time. Although the software has a bit of a learning curve for new users, the platform has many online tutorials users can consult whenever they feel stuck.
Additionally, developers can choose from numerous JS libraries to help them test their code. One feature that makes this software beginner friendly is that it saves your code drafts automatically, and developers can download the final product or save their code online.
2. JSFiddle
If you’re like me and spend half of your life force on Stack Overflow 😥, you’ll be familiar with JSFiddle. It is a valuable resource to beginner developers because it has a friendly, intuitive UI that makes it easy to test.
Furthermore, the software has a handy feature that allows users to organize their code, even without an account.
3. CodePen
When you think of CodePen, think of social media infused with a code playground. CodePen is an impressive tool for beginner developers because it’s community-centered. Developers can easily share a Pen-code the user has created in CSS, JavaScript, or HTML.
Users can also create a post, curate a pen collection (think Pinterest pins but with code), and participate in challenges together. If you’re looking for a testing platform that gives you community support and access to other knowledgeable users, use CodePen.
4. CodeSandbox
This JavaScript software allows users to define the Node.js dependencies within a JSON file. It can also run JavaScript code and other frameworks like Svelte, React.js, and Vue.js. Another great feature of this test tool is that developers can access a web-based terminal and run NPM scripts directly from their browser.
Is Tech Right For you? Take Our 3-Minute Quiz!
You Will Learn:
☑️ If a career in tech is right for you
☑️ What tech careers fit your strengths
☑️ What skills you need to reach your goals
How to Get Started Testing Your Code
Now that we’ve gone over common testing methods and tools in great detail, you may be wondering where to start. The GOOD news is that you actually don’t need any fancy bells or whistles to start testing your code. In fact, all you need is access to your website or web application and a place to take notes, like a Google doc! Here some simple steps you can follow to start testing your code (please note these are general steps that you’ll need to tailor to your specific and unique use case!):
- Prepare your test document.
- Start by writing down each item in your site’s main navigation—the one at the top of every page—and where each item should link to
- Next, do the same for any links you’ve listed in your site’s footer
- Now, list all the pages within your website: homepage, about page, contact page, maybe even a login page, etc., and write a short description for each page
- Next, list out any functionality that exists on these pages; for example, the contact page may have a form that allows visitors to submit a message
- Finally, note any differences in how your site functions depending on what device is being used; a common example of this is the site’s main navigation being collapsed into a hamburger menu on mobile devices
- Use your test document to test your website, noting any unexpected findings in the document.
- Click on each main navigation item and make sure the link works correctly
- Do the same for any links in your site’s footer
- Review each page of your website to make it loads and contains the correct information<
- Verify that any functionality works as expected; for example, if your contact page has a contact form, go ahead and send yourself a message and make sure you receive it
- Check all the differences you noted depending on what device is being used
- Finally, make sure your site’s design and layout is working as expected: Are there any spacing issues? Are any fonts missing? Are the colors correct?
- Review and fix your findings, aka, squash those bugs!
- Fix your findings one by one, making sure to verify each fix before moving onto the next one.
- Once you’ve fixed everything, it’s a good idea—and common practice—to run through your test steps one final time to make sure you didn’t introduce anynewissues while you were bug squashing.
By following this simple test process, you can find and fix bugs and improve your code without feeling overwhelmed!
From Passion to Mastery: Refining the Art of Testing Your Code
As a beginner, mastering the basics of what makes for great testing can make the process a little less overwhelming. Ultimately, I hope this guide has been helpful and provides you with a roadmap on how to test your code effectively.If you’re looking for a community of developers on a similar journey, I’d encourage you to join our Skillcrush Break Into Tech job training program today. You’ll have access to other experts and community members who can make testing a fun experience to look forward to.
Is Tech Right For you? Take Our 3-Minute Quiz!
You Will Learn:
☑️ If a career in tech is right for you
☑️ What tech careers fit your strengths
☑️ What skills you need to reach your goals

Adda Birnir
Category: Blog, Coding Languages and Tools, Learn to Code


